Sinalgo - Simulator for Network Algorithms |
|
|
|
Node ImplementationThe implementation of a project consists of several tasks:
Node BasicsEach simulated node is an instance of a subclass of sinalgo.nodes.Node. Each node has its proper instances of the Mobility, Connectivity, Interference, and Reliability model. These four model instances are created when the node is created. The Message Transmission Model is globally unique, and the distribution model is only used to initially place the nodes and is created for each set of generated nodes.As in reality, the nodes implement their own behavior. Among others, they have a method that is called when the node receives a message, and they implement the functionality to send messages to neighboring nodes. Depending on the simulation mode, the node's methods are called in a slightly different way. The following shows a high-level picture of the calling-sequences of the synchronous and asynchronous mode, which are described in more detail in the Architecture section of this tutorial. Calling Sequence in Synchronous SimulationIn the synchronous simulation mode, the framework performs the following actions for each round. Bold text indicates methods that you may overwrite or implement to define the behavior of the network nodes and the simulation. Note that the execution is strictly sequential, i.e. a single thread executes the following actions. As a result, no synchronization is needed to access global information.
Events in Asynchronous SimulationIn asynchronous simulation mode, there are only two events upon which nodes react: Arriving messages and timer events. Thus, only the methods Node.handleMessages(), (Node.handleNAckMessages()), and Timer.fire() are called. Before performing a scheduled event, the global time of the system is set to the time when the event happens.Remember that mobility is not possible in the asynchronous mode. However, the messages may be checked for interference if interference is turned on in the configuration file. Node BehaviorTo implement the node behavior (this includes your algorithm), create a class which inherits from sinalgo.nodes.Node and place the source file in the node/nodeImplementation/ folder of your project. Implement the method Node.handleMessages(); and optionally any of the other abstract methods from the sinalgo.nodes.Node class.The following list gives the most useful members of the sinalgo.nodes.Node class you may use. For a complete description of their functionality, refer to the documentation in the code.
To control the creation of a node object, the super-class provides
the two methods init() and checkRequirements() which you may overwrite in
your subclass:
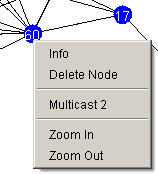
Project Specific Popup MethodsTo facilitate interaction in the GUI mode, you may register methods of your Node subclass to a popup menu that shows up when the user right-clicks on a node.
The sample code generates a message carrying an int-value, and broadcasts it to all its neighbors. Note that the method does not broadcast the message directly, but creates a timer, which will be triggered in the next round when the node performs its step. This is necessary for the synchronous simulation mode, because nodes are only allowed to send messages while they are executing their step. However, the user can only interact with the GUI while the simulation is not running. Therefore, the methods called through the popup menu always execute when the simulation is stopped. The preferred solution is to create a timer which fires in the next round and performs the desired action. Note: The MessageTimer is available in the defaultProject. This timer may send a unicast message to a given node, or multicast a message to all immediate neighbors. Please consult the documentation of the source code for more details. In some cases, it may be desirable to determine only at runtime the set of methods to be included in the menu, and on their menu text. This is possible because the popup menu for the node is assembled every time the user right-clicks on a node. The framework includes all methods annotated with the NodePopupMenu annotation of the corresponding node class. But before including such a method in the list, the framework calls the node-method includeMethodInPopupMenu(Method m, String defaultText), which allows to decide at runtime whether the menu should be included or not, and, change the menu text if necessary. To obtain control over the included menu entries, overwrite the includeMethodInPopupMenu(Method m, String defaultText) method in your node subclass. Return null if the method should not be included, otherwise the menu text to be displayed. MessagesNodes communicate by the means of messages. To implement your own message class, derive from sinalgo.nodes.messages.Message and place your source file in the nodes/messages/ folder of your project.The abstract class Message requires you
to implement a single method that returns a clone of the message,
i.e. an exact copy of the message object: Implementation Note: When a node sends a message to a neighbor node, it is assumed that the destination receives the message-content that was sent through the send() method. The framework has however no means to test whether the sender still has a reference to the sent message-object, and therefore may be able to alter its content. To avoid such problems, the framework sends separate copies to all receivers of a send() or multicast() call. Thus, for a multicast to n neighbors, the framework obtains n copies of the message and sends a copy to each of the neighbors. If and only if your project ensures that a message-object
is not altered after it was sent, you may omit the copying process by
providing the following implementation of the clone() method. (Note that the process of sending
or receiving a message does not alter the message-object. Thus, a
node may safely forward the same message-object it has received.)
public Message clone() {
return this;// This message requires a read-only policy
}
Inbox / handleMessages()Each node stores the messages it receives in an instance of the Inbox class. The inbox provides an iterator-like view over the set of messages that are received in the current round in synchronous simulation mode. In asynchronous simulation mode, the inbox contains only the single message that triggered the event. The method handleMessages(Inbox inbox) provides this inbox as single parameter.For each received message, this iterator stores meta-information, such as the sender of the message. This meta-information is available for the packet that was last returned through the next() method. In order to iterate several times over the set of packets, you may reset the inbox by calling reset(), size() returns the number of messages in the inbox. Call remove() to remove the message from the inbox that was returned by the last call to next(). Typically, a node iterates over all messages in the inbox with the following code:
while(inbox.hasNext()) {
Message msg = inbox.next();
}
if(msg instanceof ...) { \\ handle this type of message
}
NackBox / handleNAckMessages()Messages may be dropped, due to changes to the connectivity graph, interference, or the message transmission model. The framework provides a means to inform the sender node whenever a unicast message sent by the node does not reach the destination. This is an optional feature that needs to be enabled through the project configuration: set the entry generateNAckMessages to true. If your project does not drop messages at all, or if your nodes are not interested in this information, you should disable this feature to speed up the simulation.In asynchronous simulation mode, messages are kept in message-events, which are scheduled to execute when the message is supposed to arrive. At the time of execution, the framework decides whether the message arrives. If the message arrives, the method handleMessages() is called on the receiver node. If the message does not arrive, the method handleNAckMessages() is called on the sender node. In synchronous simulation mode, a sender node can handle the set of messages that were scheduled to arrive in the previous round, but were dropped. The method handleNAckMessages() is called prior to handling the messages that arrive on the node, and passes on the set of dropped messages. The use of the NackBox object, which holds the set of dropped messages, is equivalent to the Inbox. A typical implementation of the handleNAckMessages(), which needs to be added to your node implementation if you want to use this feature, looks as following:
public void handleNAckMessages(NackBox nackBox) {
while(nackBox.hasNext()) {
}
Message msg = nackBox.next();
}
if(msg instanceof ...) { \\ handle this type of message
}
EdgesNodes are connected by edges. Most projects may be happy with the default edge implementation (which is unidirectional!) or one of the implementations provided in the defaultProject. If you need a more specialized edge, create a subclass from sinalgo.nodes.edges.Edge and put the source file in the nodes/edges/ folder of your project.Note: The framework only supports one edge type at any time. The type to use can be specified in the configuration file, and it may be switched at runtime through the Preferences menu. Changing the edge type at runtime only affects edges created after the change. It does not replace the already existing edges. The following edges are already available:
TimersA timer is an object that allows a node to schedule a task in the future. When the task is due, the timer wakes up the node and performs the given task. Any timer object is a subclass of sinalgo.nodes.timers.Timer and implements the method void fire(), which contains the task this timer needs to perform.To write a project specific timer, implement a subclass of sinalgo.nodes.timers.Timer and put the source file in the nodes/timers/ folder of your project. A timer instance is started by calling either the startAbsolute(double absoluteTime, Node n) method or the startRelative(double relativeTime, Node n) method of the super class. The time specifies when the task should be scheduled, and the node specifies the node on which the task should be executed. Hint: The default project provides a MessageTimer that schedules to send a message at a given time. The message may be unicast to a specified recipient, or multicast to all immediate neighbors. Global TimersA timer object can also be used to perform a task for the simulation framework at a given time. Such a global task is not executing on a particular node, and is suited to perform simulation specific tasks (e.g. add/drop some nodes, select a random node to perform an action, change the network, ...) In synchronous simulation mode, the global timers are handled after the CustomGlobal.preRound() method. In asynchronous simulation mode, a global timer becomes an event that executes when the simulation time reached the execution time of the timer.To create a global timer, implement a subclass of sinalgo.nodes.timers.Timer just as for the regular node timers. But in contrast to the node related timers, start the timer with its method startGlobalTimer(double relativeTime). Hint: You may use the same timer implementation as a node-related timer and as a global timer. Just make sure that the fire() method of the timer class does not access the node member when the timer was started as a global timer. This member is set only when the timer is started as a node-related timer. Customized, Globally Visible Methods: CustomGlobal.javaEach project comes with a CustomGlobal class, which collects global methods specific to the project. This class extends sinalgo.runtime.AbstractCustomGlobal and is located in the root folder of your project. The following table gives an overview of the methods you may overwrite in your project specific CustomGlobal.java. (These methods are defined in the abstract superclass AbstractCustomGlobal.java with an empty body.)
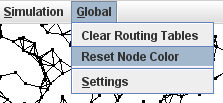
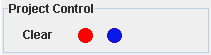
Stopping the SimulationMost importantly for the batch mode, the hasTerminated() method in the CustomGlobal class lets you specify whether a synchronous simulation has reached the final state and the framework may exit. See the calling sequence of the synchronous mode for details on when hasTerminated() is called. In asynchronous simulation, the simulation terminates when all events have been handled. To stop execution prior to handling all events, or at an arbitrary place in synchronous mode, call sinalgo.tools.Tools.exit(). This method executes some cleanup and is preferred to calling System.exit(). In particular, sinalgo.tools.Tools.exit() calls AbstractCustomGlobal.onExit(), which you may overwrite in your project specific CustomGlobal.java file.Hint: The onExit() method may be a good place to perform final logging steps and project specific cleanup. Project Specific Drop Down Methods and ButtonsYou may extend the GUI with project specific drop down menus and buttons: Add a dummy-method that takes no parameters to your CustomGlobal and implement the desired behavior in its body. There are three different ways to register the method with the GUI:1) Drop Down Menu Entry: Prefix the method with the annotation
@AbstractCustomGlobal.GlobalMethod and
specify the menuText. E.g.
@AbstractCustomGlobal.GlobalMethod( menuText="Toggle TC view")
public void myMenuMethod() { // ...
}
2) Icon Button: Prefix the method with the annotation @AbstractCustomGlobal.CustomButton and specify
the imageName and toolTipText. The imageName should be the name of a gif image of size 21x21 pixels, located in the
images folder of the project.
E.g.
@CustomButton( imageName="myImage.gif", toolTipText="Click me!")
public void myImageButtonMethod() { // ...
}
3) Text Button: Prefix the method with the annotation @AbstractCustomGlobal.CustomButton and specify
the buttonText and toolTipText. E.g.
@CustomButton( buttonText="Clear", toolTipText="Click me!")
public void myTextButtonMethod() { // ...
}
The drop down menu entries (but not the buttons) may be adapted at runtime: Every time the user opens the 'Global' menu, the menu is assembled and includes methods annotated with the GlobalMethod annotation. Before including such a method in the list, the framework calls AbstractCustomGlobal.includeGlobalMethodInMenu(Method m, String defaultText) to allow the project to decide at runtime whether the method should be included or not, and, if necessary, change the default menu text. Overwrite the method includeGlobalMethodInMenu(Method m, String defaultText) in your project specific CustomGlobal.java file to control the appearance of the 'Global' menu at runtime. The method returns the text to be displayed for each method, or null if the method should not be included. |
|||||||||||||||||||||||||||||||||||||||||||||||||||||||||||||||||||||||||||||
© Distributed Computing Group 

|